
Create & Publish
 35+ Form Fields
Build the perfect form in a few clicks and drags.
 Conditional Logic
Build forms that adapt to each user's answers.
 E-Signatures
Collect digital signatures directly in your forms.
 Share Form Links
Each form you create generates a unique URL for easy sharing.
 Embed Your Form
Embed your form anywhere that supports HTML.
 Live Preview
Preview and test your form as you build it, without affecting your live form.
 Offline Recovery
Automatically restore form data after connection loss or page refresh.
Branding & Personalization
 70+ Theme Library
Start with a beautiful theme, then make it completely your own.
 Custom Themes
Fully customize your form's design and reuse it across all your forms.
 Cover Photo
Add a custom cover photo or color to the top of your form.
 Logo Branding
Add your own logo to your forms, emails and PDF results.
 Custom Social Share
Customise how your form appears when its link is shared.
 Custom Redirect
Redirect to your own thank you URL after form submission.
 Custom Favicon
Add your own favicon to your form's browser tab.
Sending & Configuration
 Custom Domains
NEW
Send autoresponders from your own domain.
 PDF Results
Automatically generate branded PDFs from your form results.
 Autoresponders
NEW
Send automatic replies to form respondents.
Results & Management
 Results Dashboard
View, manage and export every form result from one place.
 Project Folders
Organize your forms into projects for easier management.
 Project Members
Invite other users to your projects and build forms together.
Unlimited everything.
Build unlimited forms, collect unlimited results, and use unlimited templates — all for free.
By industry
 Legal Services
One home for every legal services form — conveyancing, family law, immigration and more, ready to customize.
 Real Estate
One home for every real estate form — commercial property, estate agents, lettings & property management and more, ready to customize.
 Healthcare
One home for every healthcare form — care homes, dental practices, gp & medical practices and more, ready to customize.
 Fitness
One home for every fitness form — calisthenics, climbing, crossfit and more, ready to customize.
 Beauty
One home for every beauty form — barbering, hair salon, lashes & brows and more, ready to customize.
 Construction
One home for every construction form — bricklaying & masonry, carpentry & joinery, demolition and more, ready to customize.
 Hospitality
One home for every hospitality form — holiday rentals, hotels & b&bs, resorts & holiday parks and more, ready to customize.
By type
Contact Forms Make it easy to reach you — customizable contact forms for any site. Booking Forms Take bookings 24/7 — customizable forms your customers can submit anytime. Registration Forms Register people fast — events, courses and programs, ready to customize. Application Forms Collect applications of any kind — jobs, memberships, programs and more. Feedback Forms Hear what people think — customizable feedback forms for any audience. Lead Forms Fill the pipeline — lead-capture forms you can embed anywhere. Survey Forms Ask the right questions — customizable surveys for any audience.Popular
Contact Form Route customer inquiries cleanly — reason, urgency and account — so messages reach the right team and get the right response. Lead Capture Form Turn social media interest into leads — service, needs and contact details — captured the moment someone’s curious. Event Registration Form Register attendees for your non-profit events online, capturing contact details, dietary needs, and volunteer interest in one friendly form. Appointment Request Form Let patients request an appointment online — preferred date, time, type and reason — so your front desk can book it fast. Job Application Form Take job applications with one clean form — contact, role, resume, availability and eligibility — ready to shortlist. Customer Feedback Form Gather customer feedback on their store visit — satisfaction, what worked and any issues — so you keep shoppers coming back. Membership Signup Form Sign up new members to your community group online, capturing contact details, membership type, and consent in one tidy form.Start from a template.
Every one is free, fully customizable and ready to embed — make it yours in minutes.




Missing an app?
Pipe submissions to 6,000+ apps with Zapier, or hit any endpoint using webhooks.

Webhook Plugin
ProSend each new form result to your server as a JSON payload.
Use the Webhook Plugin to send form results to your own server endpoint as a JSON payload.
💻 This plugin is designed for developers, but a form owner can configure it for them by adding the server endpoint and sharing the Webhook Secret.
# Set Up the Plugin
Open the Plugins page for your form, select Webhook, enter your webhook URL, and click Save:
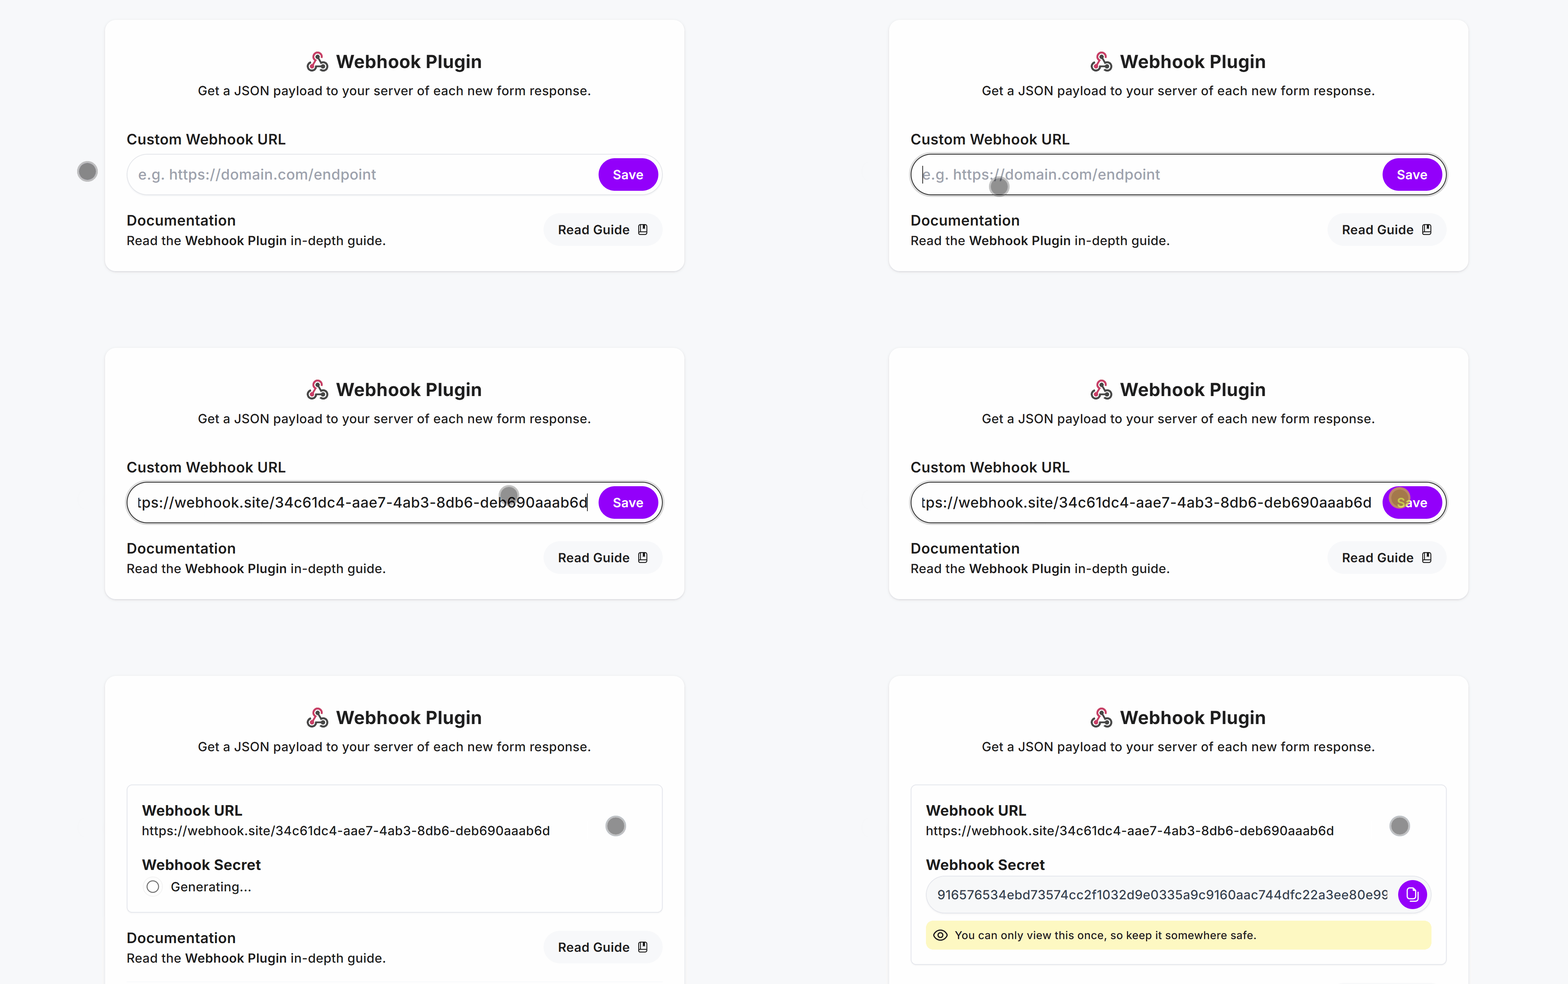
Once saved, copy the Webhook Secret and store it securely as an environment variable on your server.
# Verify Webhooks
Your server should verify that each webhook request actually came from Fun Forms before processing the data.
The Webhook Plugin sends two headers with every POST request:
X-Signature- an HMACSHA-256signature generated from the timestamp and raw request body using your webhook secret.X-Signature-Timestamp- the Unix timestamp, in seconds, used when generating the signature.
Your server should recompute the signature using the same secret, timestamp, and raw request body, then compare it with the X-Signature header. If they match, the signature is valid.
# Why the Raw Body Matters
The signature must be calculated from the exact bytes sent by Fun Forms. Parsing the JSON and then converting it back to a string can change whitespace, key order, or encoding, causing the calculated signature to differ.
For this reason, your server needs to capture the raw request body before parsing the JSON.
# Code Example
Here’s a basic example using Express.js to verify a webhook:
import express from 'express';
import crypto from 'crypto';
import bodyParser from 'body-parser';

const app = express();

// Keep the raw request body so we can verify the HMAC.
app.use(
  bodyParser.json({
    verify: (req: any, res, buf) => {
      req.rawBody = buf;
    },
  })
);

app.post('/webhook', (req, res) => {
  const signature = req.get('X-Signature');
  const timestampHeader = req.get('X-Signature-Timestamp');
  const secret = process.env.WEBHOOK_SECRET;

  if (!signature || !timestampHeader || !secret) {
    return res.status(400).json({ error: 'Missing signature or timestamp' });
  }

  // Reject requests outside the 5-minute window.
  const timestamp = parseInt(timestampHeader, 10);
  const now = Math.floor(Date.now() / 1000);

  if (Math.abs(now - timestamp) > 300) {
    return res.status(400).json({ error: 'Invalid or expired timestamp' });
  }

  // Recompute the HMAC using the timestamp and raw request body.
  const bodyString = req.rawBody.toString('utf8');
  const signaturePayload = `${timestamp}.${bodyString}`;

  const expectedSignature = crypto
    .createHmac('sha256', secret)
    .update(signaturePayload)
    .digest('hex');

  // Compare the signatures using a constant-time comparison.
  const sigBuf = Buffer.from(signature, 'hex');
  const expectedBuf = Buffer.from(expectedSignature, 'hex');

  if (
    sigBuf.length !== expectedBuf.length ||
    !crypto.timingSafeEqual(sigBuf, expectedBuf)
  ) {
    return res.status(400).json({ error: 'Invalid signature' });
  }

  // The signature is valid, so process the webhook.
  console.log('Valid webhook:', req.body);

  res.json({ success: true });
});

app.listen(3000, () => {
  console.log('Listening on port 3000');
});
# How Verification Works
The example above follows these steps:
- Read the headers - Get
X-SignatureandX-Signature-Timestampfrom the request. - Check the timestamp - Reject requests outside the 5-minute window.
- Build the signature payload - Concatenate the timestamp, a period (
.), and the raw request body. - Calculate the HMAC - Generate an HMAC
SHA-256hash using your webhook secret. - Compare signatures - Use
crypto.timingSafeEqualto compare the received and calculated signatures.
If the signatures match and the timestamp is valid, you can process the webhook. Otherwise, reject the request.
Once configured, your webhook URL will receive a JSON payload whenever a new form result is sent.
# JSON Schema
The webhook payload is a Response object and includes the following properties:
export type FunFormsResponse = {
  createdAt: string; // ISO 8601 timestamp when the response was received
  formId: string; // The form's unique ID
  responseId: string; // Unique ID for the response
  data: FunFormsResponseItem[]; // Array of response items
};

export type FunFormsResponseItem = {
  name: string; // The form field's unique name
  label: string; // The form field's label
  value: string | string[]; // String value, or an array for multi-select values
  type:
    | 'text' // Short Answer field
    | 'textarea' // Long Answer field
    | 'fullname' // Full Name field
    | 'radio' // Single-Select field
    | 'checkbox' // Multi-Select field
    | 'select' // Dropdown field
    | 'email' // Email field
    | 'number' // Number field
    | 'url' // URL field
    | 'date' // Date field
    | 'time' // Time field
    | 'tel' // Telephone field
    | 'consent' // Consent field
    | 'upload' // Upload field
    | 'signature' // Signature field
    | 'yesno' // Yes/No field
    | 'address' // Address field
    | 'matrix' // Matrix field
    | 'rating' // Rating field
    | 'scale' // Scale field
    | 'hidden'; // Hidden field
};
See below for a complete example.
# See It in Action
Let’s assume the Webhook Plugin is configured with this form:
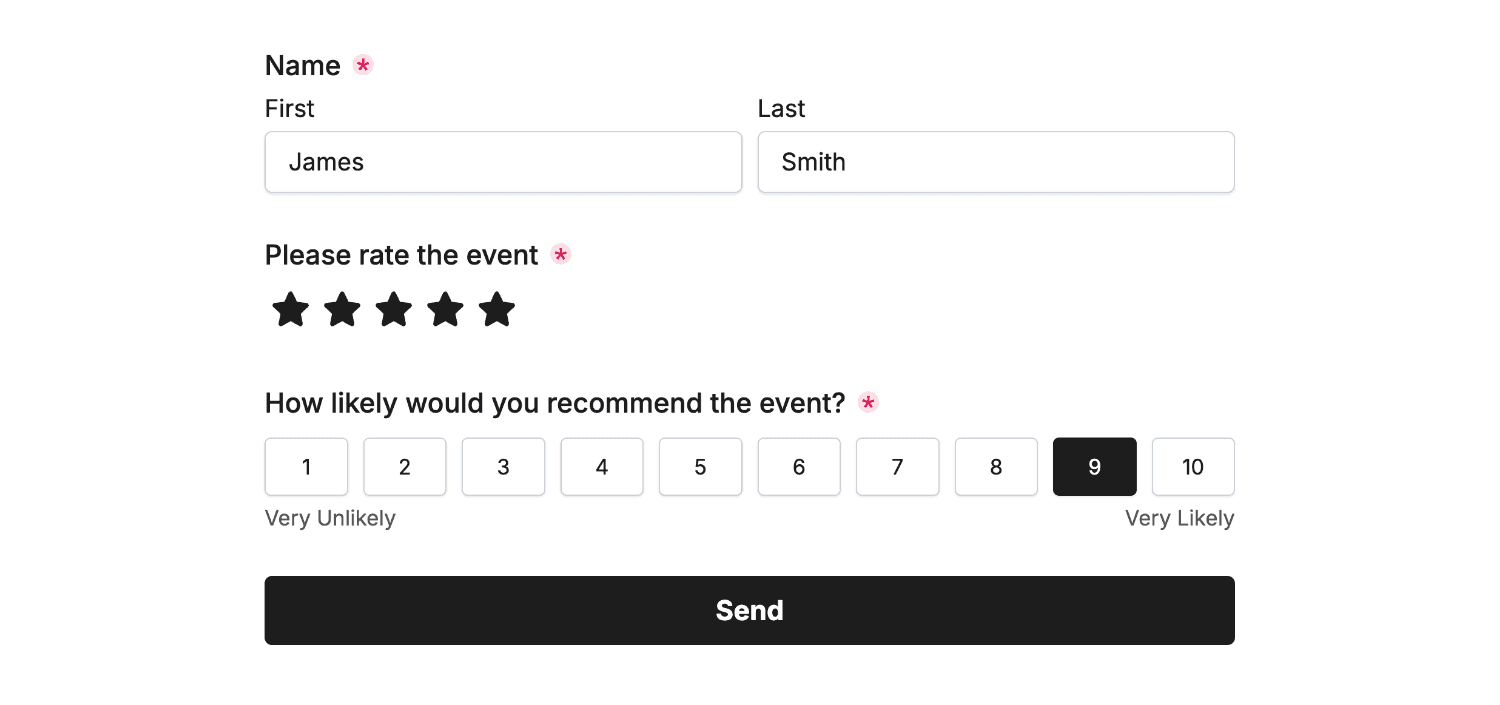
Here’s an example of the JSON payload sent to your webhook endpoint:
{
  "createdAt": "2025-05-06T17:45:31+01:00",
  "formId": "RHgUnfcG",
  "responseId": "VdN2GDOcS6el7Be433N2",
  "data": [
    {
      "name": "77485b12-6b6b-4510-9ec7-91db7de88645",
      "label": "Name",
      "type": "fullname",
      "value": "James Smith"
    },
    {
      "name": "967e3e6b-aa76-49d0-a2e9-675a25364865",
      "label": "Please rate the event",
      "type": "rating",
      "value": "5"
    },
    {
      "name": "79d3660d-a448-4470-86c3-80dbfb28418a",
      "label": "How likely would you recommend the event?",
      "type": "scale",
      "value": "9"
    }
  ]
}
The data property contains an array of response items. Each name is unique within the form and is the recommended way to access an individual response value.
For example, you can flatten the data array into an object keyed by each field’s name:
export const flattenResponse = (data: FunFormsResponseItem[]) =>
  data.reduce(
    (acc, { name, value }) => ({ ...acc, [name]: value }),
    {} as Record<string, string | string[]>
  );

// Usage

const fields = flattenResponse(payload.data);

// "James Smith"
console.log(fields["77485b12-6b6b-4510-9ec7-91db7de88645"]);
Each form field’s name can be customized to a unique string in the Fun Forms form builder. This lets you replace generated identifiers with more human-friendly names if needed.
That’s it! If you need any help, contact us anytime.
Beautiful forms for serious business
From quick enquiries to complex onboarding — signatures, PDFs, conditional logic, unlimited forms and results.
Make Free Forms

 No credit card
-
Unlimited forms
-
Unlimited results
